XML to Table
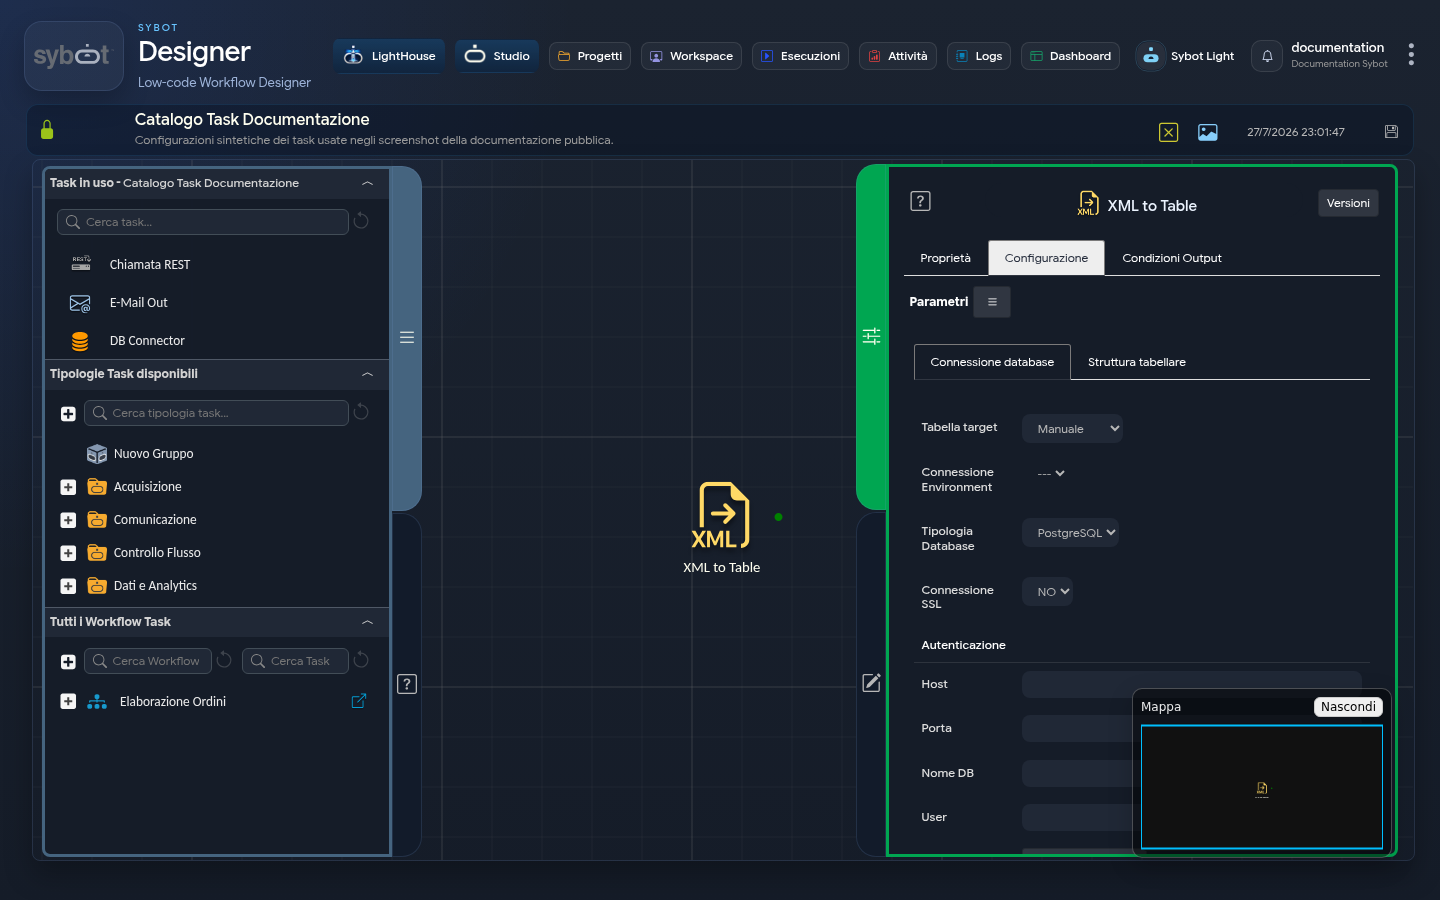
- Task type: xml-to-table
The XML to Table task allows you to import data from a tabular XML file and insert it into a database table. Its function is twofold: it connects to a database to physically write the data and, simultaneously, exposes the imported data as a Dataset for use by subsequent tasks in the Workflow (such as an Iterator). This task operates on incoming XML provided by a previous task (e.g., "Import Text").
1. Database connection
In this tab, you configure all parameters required to establish a connection to the target database.
Target table
You can define the source of credentials for the connection:
- Manual: allows the manual entry of all connection and table data in the fields below.
- Environment: allows the use of a preconfigured connection environment. By selecting one, the authentication fields are automatically populated.
Database type
Select the type of database (DBMS) to connect to. Supported options include:
- PostgreSQL
- SQL Server
- MySQL
- Oracle DB (when using Oracle, you can choose between SID and SERVICE)
- SAP HANA
SSL connection
Indicates whether the connection to the database must occur via a secure channel.
Authentication
| Field | Description |
|---|---|
| Host | Address of the authorised external database. |
| Port | Port expected by the connection to the external database. |
| DB Name | Name of the database to connect to. |
| User | Username to access the database. |
| Set Password | Opens a window to enter the password securely. |
Table management
Defines how the task must interact with the physical table in the database.
- Target table: determines the action to perform on the table:
- Create table: always creates a new table. The operation fails if a table with the same name already exists.
- Create table if not exists: creates a new table only if a table with the same name does not already exist.
- Existing table: inserts data into an existing table. By default, new data are appended to those already present (Append). By activating the Truncate Insert checkbox, the table is emptied before inserting the new data.
- Target table name: name of the table to create or into which to write data (e.g.,
users,products,log_events).
2. Tabular structure
The Tabular structure tab allows you to define the fields (columns) of the table and map each column with elements from the source XML file.
Available fields
Each row represents a column of the table. For each field, you can configure:
| Field | Description |
|---|---|
| Type | Data type of the field. Available values: NUMERIC, STRING, DATE, DATE AND TIME |
| Precision | For NUMERIC: maximum number of digits; for STRING: maximum length |
| Alias | Actual name of the column in the database table. This will be the name visible in the DB. |
| JSONPath Expression | JSONPath expression to extract the value from the source XML file (e.g., $.persona.info.name) |
Table structure management
Three buttons are present at the bottom right of the Tabular structure tab:
| Button | Action |
|---|---|
| Save | Save the defined structure |
| Import | Import an existing structure |
| Export | Export the defined structure |
This feature allows you to save, export, or reuse mappings, avoiding the manual completion of fields and reducing the risk of errors.
Technical Note
- Visibility: Structures saved in the system are visible exclusively to the user who created them.
- Deep Dive: For a detailed description of all options and the operating logic, refer to the Table Structure page.
3. Configuration Example
To create a users table with the following fields:
| Type | Alias | JSONPath Expression |
|---|---|---|
| STRING | name | $.user.info.name |
| STRING | $.user.info.email | |
| NUMBER | age | $.user.info.age |
| STRING | city | $.address.city |
| DATE | registration_date | $.registration.date |
| DATETIME | registration_datetime | $.registration.datetime |
The result of this configuration will be the creation of a table in the database with the columns name, email, age, city, registration_date, and registration_datetime (Alias) populated with values extracted from the XML (JSONPath Expression).
Aliases with special characters or uppercase letters
If you want to use uppercase letters, special characters, or spaces in column names, you must enclose the Alias in double quotes (e.g., "User Name").
| Type | Alias | JSONPath Expression |
|---|---|---|
| STRING | "Name" | $.name |
| STRING | "Surname" | $.surname |
Result in the Database
4. Handling Nested XML Structures
The XML to Table Task is capable of handling XML files containing nested elements, that is, a hierarchy of data within the main record. Instead of requiring the creation of separate tables (normalization), the Task can serialize the entire nested data block into a single text column, typically in JSON format.
Practical Example
Consider the following input XML file, where each <person> has a nested list of <departments>:
<people>
 <person>
 <name>Luca</name>
 <surname>Rossi</surname>
 <departments>
 <department>Marketing</department>
 <department>Sales</department>
 </departments>
 </person>
 <person>
 <name>Maria</name>
 <surname>Bianchi</surname>
 <departments>
 <department>HR</department>
 </departments>
 </person>
 ...
</people>
The goal is to map each <person> to a row in the table, preserving the list of departments associated with each person.
Configuration in the "Table Structure"
To achieve this result, the configuration in the "Table Structure" tab will be as follows:
| Type | Precision | Alias | JSONPath Expression |
|---|---|---|---|
| String | 1000 | name | $.name |
| String | 1000 | surname | $.surname |
| String | 4000 | departments | $.departments |
Explanation:
- The name and surname columns are mapped directly, as their values are simple elements (
<name>,<surname>). - For the departments column, the Expression is set to departments. This instructs the Task not to look for a single value, but to take the entire content of the
<departments>tag for each person. - The Task automatically converts this XML fragment into its equivalent JSON before inserting it into the database column.
Result in the Database
By applying this configuration, the Task will produce a table where the departments column contains a JSON string representing the original nested structure. This allows the entire hierarchical information to be preserved in a single text field, ready to be analysed by other tools or Tasks if needed.
Extracting Sub-elements with JSONPath
If you wish to extract individual nested elements, such as department names, you can use a specific JSONPath Expression. For example:
| Type | Precision | Alias | JSONPath Expression |
|---|---|---|---|
| String | 1000 | name | $.name |
| String | 1000 | surname | $.surname |
| String | 1000 | department_names | $.departments.department[*].details.name |
With this configuration, the XML to Table Task selects all name values present in the department array and inserts them into the department_names column of the database, optionally separating them with a comma.
Result in the Database
| name | surname | department_names |
|---|---|---|
| Luca | Rossi | Marketing, Sales |
| Maria | Bianchi | HR |
This approach allows you to extract only the necessary data, without serialising the entire JSON block, making the table easier to query and use in other Tasks or reports.
5. Output Parameters
Once the XML to Table Task has completed processing, it exposes a rich set of output parameters. These parameters not only provide information about the outcome of the operation but also make the processed data available in various formats for subsequent Tasks.
- result: Provides the overall status of the Task execution (e.g., "Success" or an error message).
- targetTable: Returns the name of the database table where the data has been inserted.
- rowCount: Indicates the total number of rows that have been inserted into the destination table.
- DataExportCsv: Returns the entire set of processed data, formatted as text in CSV (Comma-Separated Values) format.
- DataExportJson: Returns the entire set of processed data, formatted as a JSON string.
- Dataset: This parameter represents the name of the table column (e.g.,
name). It is the most important parameter for linking this Task to an Iterator. To access the values of a specific column during iteration, use the syntax Dataset.ColumnName. - DataColumn: This parameter allows you to access the entire content of a column as a single entity (e.g., an array or list).
- DataColumn.ColumnName: Returns all values of the column "ColumnName". For example: "Luca, Maria, Giovanni, Elena"
- resultJson: Represents the result of the task execution in JSON format, including general information, configurations, and execution details.
6. Example resultJson Parameter
{
  "run_info": {
    "status": "Completed",
    "run_result": "Success"
  },
  "output_parameters": {
    "exitStatus": "0"
  }
}